
this is what you don't want it to look like!
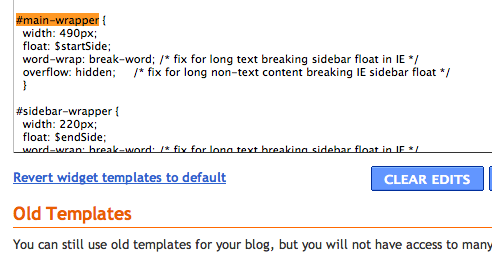
First up, we need to determine what pixel area we're working with in our content area. The content area is the space where your blog entries show up. Generally to the side of, or in between your side panels. If you have a Mac, you can do a Shift+Apple+4 and "measure" the pixel width of this area to get a general idea. I'm working with a 490px content area. I know this by going to Dashboard --> Design --> Edit HTML and searching for "#main-wrapper" and it should tell you the pixel amount. (If your layout doesn't have this CSS in it, leave a comment below and I'll be happy to measure your layout for you! Just be sure to check back to see the answer and measurement!) You can also skip the measurement all together and just play around with a width number in your Blogger update. (For example, start with width=400 and if it's too skinny, go 450. if it's too wide, go 375. Play with it until you get a width that you think looks attractive!)
it should look something like this
Now that you know that, we can move on! I don't suggest hosting your photos with Blogger. AKA Don't start writing your entry and then use the little landscape button up there in the text editor to upload a photo. Why do I say this? Blogger compresses your photos and makes them grainy. Blogger also chooses preset sizes for "Small/Medium/Large" You can edit them, but they will be grainy.
I suggest using a third party host such as Photobucket to host your files. (I know many will disagree with me, and even I did myself not long ago, but Photobucket is a great resource for someone who doesn't need a professional/ton amount of space and it's free. Even if you need unlimited bandwidth, it's like $2-$3 a month! Flickr is also a good alternative but unless you're a bit more familiar with coding, it can get a tad bit trickier! There are several more steps involved with Flickr. (So for the sake of this tutorial, we're using Photobucket.com!) You can use any hosting site that gives you a direct link! For example, ImageShack, TinyPic, etc!
Now upload your photos! When you hover over the picture you want to select, the Direct Link will be copyable. Copy it and head over to your "New Post" page on Blogger.

Write up your post as normal and then find the places you want to place the pictures. Copy and paste this code below to put in *each* spot for the photo! ** Be sure to change the "490" number to the size of YOUR content area! If you want to give it a little padding, reduce it by 5 pixels and center the image! Be sure to delete the asteriks before using! **
<*img src="Direct Link URL Here" width="490" alt="Description of Photo"*>
* The ALT tag sends this message to Google/search engines when people are looking for something specific. If I tagged mine "Kaelah Bee Honeybee Outfit" then my photos would show up when someone Googled "Kaelah Bee". If you blog a rad recipe then add that description! You've got new readers just waiting to find you! The alt tag is completely optional!
* The reason we use "width" tag and not a "height" one or both is because your browser will automatically resize your image proportionally to fit the area and since we're more concerned with them lining up width-wise, that is all we take into consideration!
If you follow these short handy tips then your layout is for sure going to look like a million bucks!
A Few More Photo Tips...
* When editing your photos, make sure the file size is 72 dpi and not 300! This will help with layout loading time!
*Change up the composition by putting two photos side by side in the space of one! This helps break up the monotony of really big pictures!
*If you'd like to make your photo a clickable link (for a click-through source) then use this code below: (just remember to remove those pesky asteriks!)
<*a href="URL to Page/Source Here"><*img src="Direct Link URL Here" width="490" alt="Description of Photo"*><*/a>
Overall you should just use your blog to expand your knowledge of everything! Don't feel resigned to having something on your layout that you don't like. It should be an inspiring place that you love to contribute to, and it should be an aesthetically pleasing place for your readers to encourage them to stay a little while. If you don't know how to do something, Google it! I'm graduated with a BFA and I still have to Google certain things!
PS: I really wasn't sure how "easy" to make this so if you have questions, please chime in in the comments below! I'll be happy to try and answer those! Just be sure to check back every so often! Happy Blogging!
No comments:
Post a Comment